|
|
Greenshot
by Chris Taylor
When writing articles for
the newsletter, I often include screenshots which
illustrate a particular operation or
configuration on the computer.
Windows includes a function for taking screen
captures, but it is pretty rudimentary. You can
press the Print Screen button on your keyboard to
capture the full desktop, or Alt-Print Screen to
capture just the active window. You can then
paste the screenshot into any application that
can handle a graphic.
Over ten years ago I went looking for a free
program that would be a bit more capable. I came
across Printkey and it did a nice job.
Unfortunately, they switched to a commercial
model and new versions are no longer free.
A couple of years ago, my search for a
replacement found Greenshot; a free and open
source program. This review is based on release
candidate 2 for version 1.1.
Greenshot is available in many languages and has
been downloaded more than 2 million times.
Currently, there are over 100,000 downloads per
month, so it seems many others find the program
useful as well. The program is tiny; the
installer is 1.2MB and the installation takes
under 3MB. The .NET Framework v2 or greater is
required. The installer will check and install it
if required.
Greenshot loads as an icon in the system tray
when you start Windows, so it is always
available. You interact with it by clicking on
the tray icon or through user-definable hot-keys.
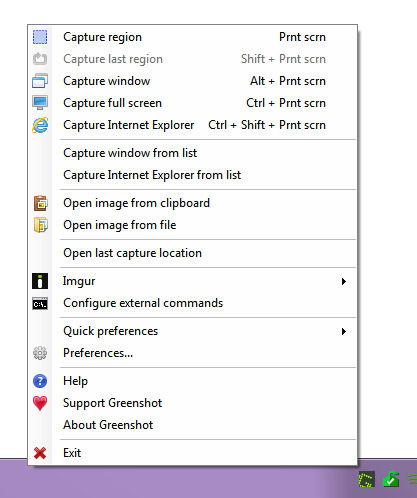
Tray icon menu
To capture any
rectangular area on the screen, select Capture
region from the menu or press the hotkey
(default: Print Screen) and cross hairs will
appear on screen. Move the cross hairs to a
corner of the region you want to capture, click
and hold the mouse button, and drag out a box
defining the area you want to capture. As you
drag, the capture area appears as a teal-shaded
box, making it easy to see what will be captured.
As well, two other visual cues help. First, there
are numbers that appear above and to the left of
the teal box showing the dimensions of the box in
pixels. Second, there is a circle offset from the
box which shows a highly magnified image of the
area currently under the cross hairs. These two
cues allow you to be very precise in capturing
exactly what you want.

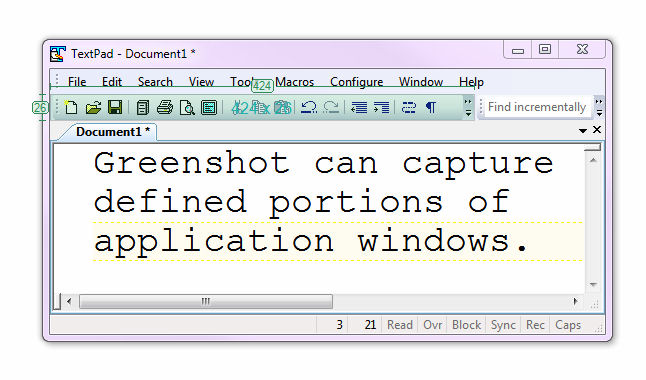
Capture area
Another common capture
method is window mode. It allows you to easily
take a snap of a single application window or a
sub-window such as a toolbar or an edit field.
Once activated, as you move the mouse around, the
teal box will show what will be captured when you
click the mouse button.
 Window mode capturing a toolbar
If you ever
wanted to do a screen capture of a web page but
the web page is too large to be seen in its
entirety, you will appreciate the option Capture
Internet Explorer. It will grab an entire web
page as a single image, even portions that you
would normally have to scroll to see.
Once a screen capture is completed, you can: send
it to the printer; save it to a file (supported
graphic formats are BMP, GIF, JPG, PNG, and
TIFF); copy it to the Windows clipboard; send it
to a program such as Microsoft Office programs,
Mozilla Thunderbird, or Microsoft Paint; or open
it in the Greenshot Image Editor. If you send to
the printer, there are options to expand or
shrink the image to fit the page, rotate the
image and add elements such as the date and time.
The Greenshot Image Editor is very slick. If you
open your screenshot there, you can manipulate
the image in many ways such as cropping,
rotating, or adding highlights, rectangles,
ovals, lines, arrows, and text. You have control
over fill colour, and line thickness/colour. You
can even choose the colour by pointing anywhere
on screen, allowing you to easily match colours.
There is also a button to create a drop shadow on
any element you add.
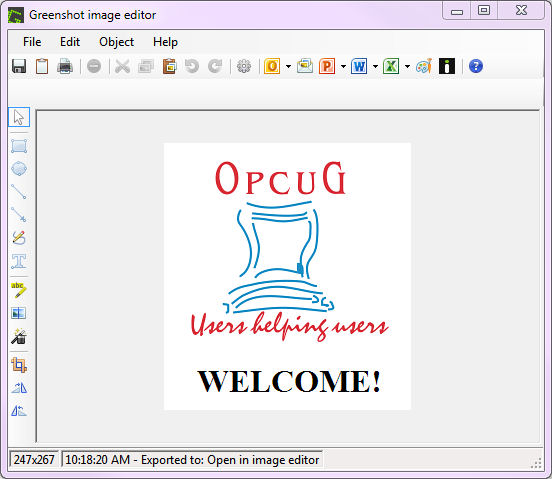
Greenshot image editor
If parts of your
image contain sensitive information, such as a
password or bank account number, there is an
obfuscate tool which can pixelate or blur parts
of the image. You can control the degree of
obfuscation.
Greenshot added a new feature in release
candidate 2 that I find very useful. If you use
the Image Editor to add elements to the screen
capture, you can now save the image as a
*.greenshot file. Then, you can reload it later
into the Greenshot Image Editor and all your
customizations remain fully editable.
Greenshot has quite a few program options; You
can delay a screen capture to allow you time to
do arrange things such as opening a menu to
capture it as part of the image; capture the
mouse pointer as part of the image; play a camera
sound when the screen capture is taken; hide the
magnifier; and more.
Besides the full installer package, there is a
portable version available, so if you want to do
something like run it from a flash drive, this is
doable.
Greenshot is a small, powerful, flexible screen
capture program. If you have an occasional need
to grab a screen image to insert into an email or
document, Greenshot can expand greatly on
Windows’ native capabilities. For those who
document computer programs or operations,
Greenshot is a program you really must try
Bottom Line:
Greenshot v1.1
System requirements: Windows XP/Vista/7/8, .NET Framework 2.0 or better
Price: Free and open source (GPLv2)
http://getgreenshot.org
Originally published: November, 2013
top of page
|
Archived Reviews
A-J
K-Q
R-Z
The opinions expressed in these reviews
do not necessarily represent the views of the
Ottawa PC Users' Group or its members.
|

